> ## Documentation Index
> Fetch the complete documentation index at: https://vastai-80aa3a82-ltxv2-serverless.mintlify.site/llms.txt
> Use this file to discover all available pages before exploring further.
# Creating Templates
## Introduction
Creating a template is simple - it's just telling Vast.ai how you want your instances to be configured. This guide will walk you through creating your first template step by step.
## Prerequisites
* A Vast.ai account
* [SSH client installed on your local machine and SSH public key added in the SSH Keys tab in the Keys section of your console](https://cloud.vast.ai/manage-keys/)
* [(Optional) Install and use vast-cli](/cli/get-started)
## Ways to Create Templates
You have three options:
### 1. Edit an Existing Template (Recommended for Beginners)
Start with one of our recommended templates and customize it to your needs. This is the easiest way to get started.
**Best for:** First-time users, quick customization of existing setups
### 2. Create from Scratch
Click "+ New" on the templates page for a blank template and configure everything yourself.
**Best for:** Users who know exactly what they need
### 3. Use an Existing Docker Image
Find a Docker image on DockerHub or another registry and create a template around it.
**Best for:** Users with a specific application in mind (e.g., nginx, postgres, a specific ML framework)
## Tutorial: Create Your First Template
Let's create a simple template together. We'll edit the NVIDIA CUDA template from the [Quick Start](/documentation/templates/quickstart) guide.
### Step 1: Open the Template Editor
1. Go to [cloud.vast.ai/templates](https://cloud.vast.ai/templates/)
2. Find the "NVIDIA CUDA" template (or any recommended template)
3. Click the pencil icon to edit
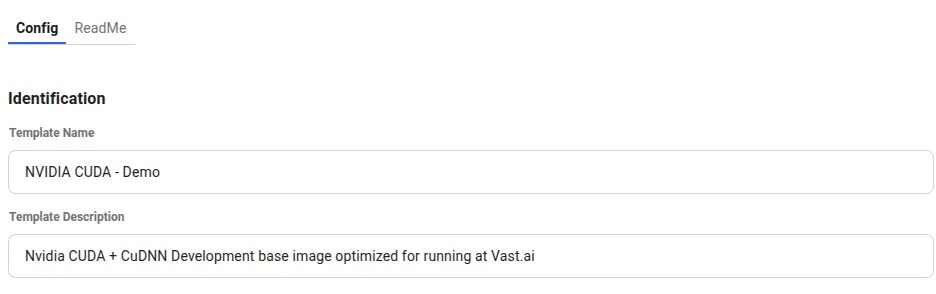 You'll see two tabs: `Config` and `ReadMe`. Stay on the Config tab.
### Step 2: Give Your Template a Name
In the **Identification** section:
* Change the **Template Name** to something descriptive (e.g., "My First Template")
* Add a **Template Description** if you'd like (optional)
### Step 3: Choose Your Docker Image
In the **Docker Repository And Environment** section, you'll see the **Image Path:Tag** field.
You can use:
* **Any public Docker image** (e.g., `nginx:latest`, `postgres:14`, `python:3.11`)
* **Vast.ai base images** (e.g., `vastai/base-image`, `vastai/pytorch`)
* **Your own custom images** from any registry
For this tutorial, keep the existing NVIDIA CUDA image or try `nginx:latest` for a simple web server.
For a complete explanation of all Docker settings, see our [Template Settings](/documentation/templates/template-settings#docker-repository-and-environment) guide.
### Step 4: Add Ports (Optional)
If your application needs external access, add ports in the **Ports** section.
For example, if you're running nginx, add port `80`.
### Step 5: Set Environment Variables (Optional)
If your Docker image requires environment variables, add them in the **Environment Variables** section.
Never put sensitive information (passwords, API keys) in template environment variables if you plan to make the template public. Use your [account settings](https://cloud.vast.ai/account/) instead.
### Step 6: Choose a Launch Mode
Select how you want to access your instance:
* **Jupyter + SSH** - Best for interactive development (default for most use cases)
* **SSH only** - If you don't need Jupyter
* **docker ENTRYPOINT** - If you want the container to run exactly as designed
For this tutorial, keep the default (Jupyter + SSH).
For detailed information about launch modes, see our [Template Settings](/documentation/templates/template-settings#select-launch-mode) guide.
### Step 7: Save Your Template
Scroll to the bottom and click one of the save buttons:
* **Create** - Saves the template to "My Templates" for later use
* **Create & Use** - Saves and immediately takes you to the offers page to rent an instance
You'll see two tabs: `Config` and `ReadMe`. Stay on the Config tab.
### Step 2: Give Your Template a Name
In the **Identification** section:
* Change the **Template Name** to something descriptive (e.g., "My First Template")
* Add a **Template Description** if you'd like (optional)
### Step 3: Choose Your Docker Image
In the **Docker Repository And Environment** section, you'll see the **Image Path:Tag** field.
You can use:
* **Any public Docker image** (e.g., `nginx:latest`, `postgres:14`, `python:3.11`)
* **Vast.ai base images** (e.g., `vastai/base-image`, `vastai/pytorch`)
* **Your own custom images** from any registry
For this tutorial, keep the existing NVIDIA CUDA image or try `nginx:latest` for a simple web server.
For a complete explanation of all Docker settings, see our [Template Settings](/documentation/templates/template-settings#docker-repository-and-environment) guide.
### Step 4: Add Ports (Optional)
If your application needs external access, add ports in the **Ports** section.
For example, if you're running nginx, add port `80`.
### Step 5: Set Environment Variables (Optional)
If your Docker image requires environment variables, add them in the **Environment Variables** section.
Never put sensitive information (passwords, API keys) in template environment variables if you plan to make the template public. Use your [account settings](https://cloud.vast.ai/account/) instead.
### Step 6: Choose a Launch Mode
Select how you want to access your instance:
* **Jupyter + SSH** - Best for interactive development (default for most use cases)
* **SSH only** - If you don't need Jupyter
* **docker ENTRYPOINT** - If you want the container to run exactly as designed
For this tutorial, keep the default (Jupyter + SSH).
For detailed information about launch modes, see our [Template Settings](/documentation/templates/template-settings#select-launch-mode) guide.
### Step 7: Save Your Template
Scroll to the bottom and click one of the save buttons:
* **Create** - Saves the template to "My Templates" for later use
* **Create & Use** - Saves and immediately takes you to the offers page to rent an instance
 Congratulations! You've created your first template.
## Next Steps
Now that you know the basics, you can:
### Explore All Template Options
See our [Template Settings](/documentation/templates/template-settings) for complete documentation of every field in the template editor.
### Add Advanced Customization
Learn about runtime customization and building custom Docker images in our [Advanced Setup](/documentation/templates/advanced-setup) guide:
* **PROVISIONING\_SCRIPT** - Run setup scripts when instances start
* **PORTAL\_CONFIG** - Configure the Instance Portal
* **Base Images** - Build custom Docker images with Vast.ai security features
* **VM Templates** - When to use virtual machines instead of containers
### Manage Your Templates
Learn how to update, share, and troubleshoot templates in our [Managing Templates](/documentation/templates/managing-templates) guide.
### See Real Examples
Check out our [GROBID example](/documentation/templates/examples/grobid) to see a complete template creation workflow for a real application.
## Common Use Cases
### I want to run a specific application (e.g., nginx, postgres)
1. Find the official Docker image on [DockerHub](https://hub.docker.com/)
2. Create a template with that image path
3. Add required ports and environment variables
4. Save and launch
### I want to customize a Vast recommended template
1. Edit one of our recommended templates
2. Add a PROVISIONING\_SCRIPT environment variable pointing to your setup script
3. See [Advanced Setup](/documentation/templates/advanced-setup#provisioning-script) for details
### I want to build my own custom Docker image
1. Create a Dockerfile (optionally FROM a Vast base image)
2. Build and push to a container registry
3. Create a template with your custom image path
4. See [Advanced Setup](/documentation/templates/advanced-setup#building-custom-docker-images) for details
Congratulations! You've created your first template.
## Next Steps
Now that you know the basics, you can:
### Explore All Template Options
See our [Template Settings](/documentation/templates/template-settings) for complete documentation of every field in the template editor.
### Add Advanced Customization
Learn about runtime customization and building custom Docker images in our [Advanced Setup](/documentation/templates/advanced-setup) guide:
* **PROVISIONING\_SCRIPT** - Run setup scripts when instances start
* **PORTAL\_CONFIG** - Configure the Instance Portal
* **Base Images** - Build custom Docker images with Vast.ai security features
* **VM Templates** - When to use virtual machines instead of containers
### Manage Your Templates
Learn how to update, share, and troubleshoot templates in our [Managing Templates](/documentation/templates/managing-templates) guide.
### See Real Examples
Check out our [GROBID example](/documentation/templates/examples/grobid) to see a complete template creation workflow for a real application.
## Common Use Cases
### I want to run a specific application (e.g., nginx, postgres)
1. Find the official Docker image on [DockerHub](https://hub.docker.com/)
2. Create a template with that image path
3. Add required ports and environment variables
4. Save and launch
### I want to customize a Vast recommended template
1. Edit one of our recommended templates
2. Add a PROVISIONING\_SCRIPT environment variable pointing to your setup script
3. See [Advanced Setup](/documentation/templates/advanced-setup#provisioning-script) for details
### I want to build my own custom Docker image
1. Create a Dockerfile (optionally FROM a Vast base image)
2. Build and push to a container registry
3. Create a template with your custom image path
4. See [Advanced Setup](/documentation/templates/advanced-setup#building-custom-docker-images) for details